A Font editor is provided to generate a Font with Signed Distance Fields.
To open the Editor, select from the menu "Tools \ I2 SmartEdge \ SDF Font Maker"

Drag a font into the Font field or click the dot at the end to select a TrueType Font (ttf file).
The Editor will render each character of that TrueType Font and create a distance field with each of them. Then will pack them and generate a Unity Font that could be used with the SmartEdge plugin.
But before generating the font, some settings have to be provided.

Packing
This section controls how the characters are packed in the atlas.

You could specify a Font Size and select "Use Font Size" from the Atlas popup, to create an atlas with the minimum size that could fit all characters at the specified size.
However, a better approach is to select the atlas size from the popup (e.g. 512x512) and when generating the font, the editor will find the FontSize that makes the characters use most of the texture space. That way the empty spaces on the texture are reduced and the final font will have higher quality.
To find the best font size, the plugin can use two methods, the Fast or the Optimum.
Fast |
When using Fast, the plugin will estimate a conservative size that make the characters fit the texture. However, some TrueTypeFonts have different character proportions depending on the font size. Therefore, sometimes it's possible to use a bigger font and still fit in the selected atlas. |
Optimum |
This method applies an extra step after computing the Fast. Starting from the size computed by the Fast step, it tries a quick generation increasing the font size and stops when the font no longer fits into the atlas. |
As most of the time, Optimum packing only needs to loop 2 o 3 times, this step is not as expensive as it sounds and so it provide the optimum result relatively fast unless the font has hundreds of characters. In which case is advice to try generating the atlas with Fast packing for testing and only apply an Optimum packing when all other parameters (Spreading, character set, etc) are set to the correct values.
Signed Distance Field
These are the parameters that define how the Signed Distance Field is computed.

"SDF Spreading" controls how wide is the distance field falloff. Higher values allow creating a bigger Glow, softer Soft Shadow, wider Bevel, etc. However, as the falloff starts become wider, the distance become less accurate and so the resulting texture could have less quality.
So, always test different spreading sizes to make sure you are selecting a value that allows the effects you need while still preserving the quality.
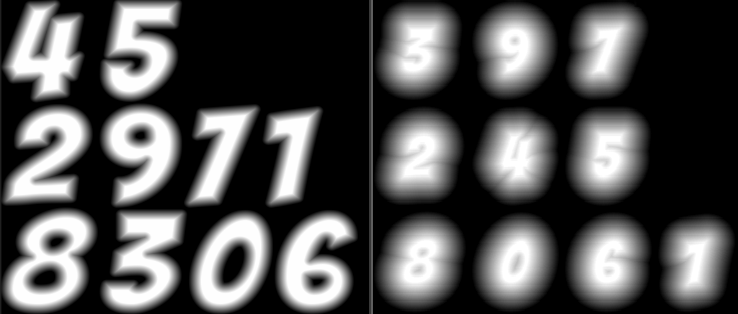
The Quality popup defines how much the character is super sampled to create more accurate Distance Fields.
Fastest will render the TrueTypeFont at the specified fontSize and generate distance field from there. But most of the time, extra accuracy is needed to represent the font curves. Thats why it's better to render the font at higher resolutions, compute the distance field with that extra accuracy, and then scale it down to the desired FontSize.
Quality controls how magnified is the font. Fastest doesn't magnify at all, while Nicest renders to a 32 times bigger texture.
Depending on the number of Character and atlas size, Nicest could take quite some time, so its advisable to first generate the font with Normal or a lower value. Then when the spreading and other parameters are tested to allow the effects you need, then generate the font again, with Optimum packing and set to Nicest.
Character Set
The more texture space that could be assigned to each character, the better quality they will have. But even with a huge atlas, if there are hundreds of characters rendered the space they can use will be relatively smaller. This become more apparent on Asian languages, where there is a high number of characters and signs.
Most of the time, all characters in the font are not used. So the editor allows generating only the characters that are going to be used to maximize the texture space.
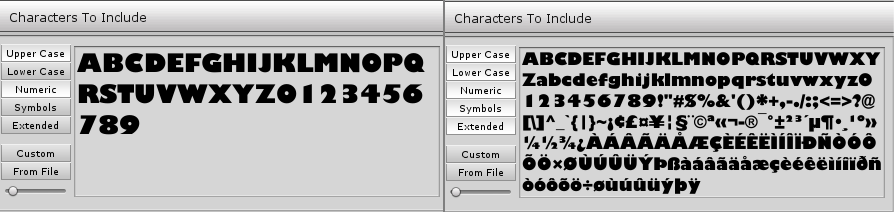
There are several options, you can type the characters you want to include or click on the filters to Add/Remove some common sets.
Also, when clicking the From File button, the editor allows you selecting a text file containing all the texts in your game. It will parse that file and extract the characters that are used. A common usage of this, is to select the spreadsheet with all your localizations, and rendering only those characters.
Once the character set is selected, you can use the slider bellow the filters to make the preview bigger or smaller. The font used to render the preview is the font that will be used for rendering the atlas, so in the preview window you can see how that font looks.
Once all parameters are set, click the Generate Font Button. That will start processing each of the characters and will generate the atlas with all of them.
Please, be aware, that in the first versions, the editor needs to keep in focus to keep rendering characters. If the editor is minimized or another app is selected, the process will be paused. This will be improved ASAP.
If the font is going to be used with NGUI, you should also check the Create Font Data. That options creates a text file that NGUI will need to create an NGUI font.
Once the atlas is generated, a preview will be shown bellow with the dimensions, and memory usage.

Created with the Personal Edition of HelpNDoc: Easily create EBooks